Scrolling a SpriteKit Scene with SKCameraNode
Apple added the SKCameraNode class to SpriteKit in iOS 9 and OS X 10.11 to make it easier to scroll and zoom in SpriteKit scenes. This article shows what I’ve learned about scrolling SpriteKit scenes. This article assumes you have created a SpriteKit Xcode project and a scene for the project. This article focuses on iOS, but most of it should apply to Mac games. The main difference is you would substitute mouse dragged events for touches.
What you need to do to scroll a SpriteKit scene can be divided into two areas: tasks to perform in the scene file, the .sks file, and the the coding tasks. In the scene file you must perform the following tasks:
- Add a camera to the scene.
- Name the camera so you can access it in your code.
- Align the camera with the scene.
- Make the camera you created the scene’s camera.
The coding tasks you must perform are the following:
- Add a variable for the camera so you can move the camera to scroll the scene.
- Add event handling code to scroll the scene.
Scene File Tasks #
Select the .sks file in the project navigator to open the scene editor. Find the camera object in the object library.
Drag the camera object to the scene to add the camera to the scene.
After adding the camera object to the scene, select it so you can name the camera. Go to the attributes inspector and enter a name in the Name text field.
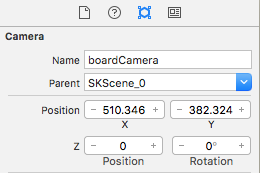
Remember the name you gave the camera. You’ll need to know the name when you access the camera in your game code.
Now it’s time to align the camera with the scene. Xcode’s scene editor is normally zoomed in too much to see the viewports for the camera and the scene. Use the zoom controls at the bottom of the scene editor to zoom out, click the minus button. You should see a yellow-orange rectangle around the scene and a second rectangle around the camera. These rectangles show the viewports. Select the camera and drag it so its rectangle is on top of the scene’s rectangle so it looks like one rectangle in the scene.
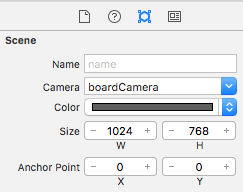
Finally you can tell the scene to use the camera you created as the scene’s camera. Select the scene from the jump bar at the top of the scene editor. Choose your camera from the Camera menu in the scene’s attributes inspector.
Coding Tasks #
The first coding task is to add a variable to represent the camera so you can adjust its position when scrolling the scene. The most common place to add this variable is in your GameScene class. Here’s a Swift example:
var boardCamera = SKCameraNode()
To access the camera you created in the scene editor, call the scene class’s childNodeWithName method, supplying the name you gave the camera in the scene editor.
boardCamera = self.childNodeWithName("boardCamera") as! SKCameraNode
Make sure the name you supply to childNodeWithName matches the name in the scene editor. An exception will be raised if the names don’t match, and you won’t be able to play your game.
You could combine the two lines of code into a single let statement if you want. I find it difficult to use let statements for class data members in Swift, which is why I used a var.
Scrolling #
The last task is to scroll the scene based on player input. You must perform the following tasks for iOS:
- Find the location of the current touch by calling the
UITouchmethodlocationInNode. - Find the location of the previous touch by calling the
UITouchmethodpreviousLocationInNode. - Subtract the previous touch location from the current touch location to determine how far the player dragged.
- Move the camera by adjusting its position based on the drag distance.
The following code demonstrates scrolling the scene vertically by dragging a finger over the scene:
override func touchesMoved(touches: Set<UITouch>, withEvent event: UIEvent?) {
    for touch in touches {
        let location = touch.locationInNode(self)
        let previousLocation = touch.previousLocationInNode(self)
        let deltaY = location.y - previousLocation.y
        boardCamera.position.y += deltaY
    }
}
If you want to scroll horizontally, calculate deltaX and use it to adjust the camera’s x position.
Needed Enhancements #
If you add the touchesMoved function from the previous section to your game, you’ll notice one big problem. You will be able to scroll the scene, but there’s nothing stopping the player from scrolling past the scene boundaries.
What you need to add are variables representing the minimum and maximum values the camera should have for its x and y positions. I can’t tell you what the minimum and maximum values should be because they depend on the size of your scene and the screen size of the device. You’re going to have to experiment and see what minimum and maximum camera values work for your game.