Xcode 5: Auto Layout Buttons
If you open a xib file or storyboard in Xcode 5, you should see the following set of buttons at the bottom of the canvas:
These buttons allow you to perform common auto layout tasks. The buttons running from left to right are the following:
- Align
- Pin
- Resolve Auto Layout Issues
- Resizing Behavior
If you see three buttons instead of four, you must convert your xib file to the new xib file format introduced in Xcode 5. The Resolve Auto Layout Issues button is new in Xcode 5 and requires the new xib file format. Read my Xcode 5: New Xib File Format post for instructions on converting a xib file to the new format.
If you don’t see any of the four buttons, your project is not using auto layout. To turn on auto layout, open the file inspector and select the Use autolayout checkbox
Align #
Use the Align button to add alignment constraints. In most cases you’ll be aligning multiple UI elements, but you can also align a single UI element with its containing view.

Select a checkbox to add a constraint. Use the Update Frames to specify the frames where the newly added constraints apply. Click the Add Constraints button to finish adding the constraints.
Pin #
Use the Pin button to add spacing, width, and height constraints.
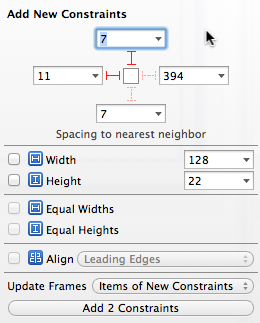
In the top section of the screenshot you can see four struts, which are between the small white square and the four text fields with the values 7, 11, 394, and 7. Clicking a strut pins the UI element to its nearest neighbor on that side. In the screenshot I’m pinning the UI element to its nearest neighbor on the top and left.
Resolve Auto Layout Issues #
When working with auto layout in Xcode 4, Interface Builder created constraints for you. Xcode 5 gives you more control over constraints, but with this control comes more opportunity to make mistakes. Use the Resolve Auto Layout Issues button to fix your mistakes.
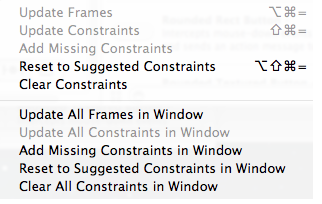
Clicking the Resolve Auto Layout Issues button opens a menu where you can update constraints, add missing constraints, reset to suggested constraints, or clear all constraints.
Resizing Behavior #
Use the Resizing Behavior button to specify which views to apply the constraints when resizing a view.

As you can see in the screenshot, you can apply the constraints to the view’s siblings and ancestors or to its descendants.